Monday, October 29, 2012

Cake Pops: An Overview

Like I said in my first post, when I discovered cake pops and made them for the first time I realized how much I loved baking!! How hard could it be to put cake on a stick and cover it? You'd be surprised!

After various trials and attempts at making cake pops, I feel as though I have finally gotten the process down and could definitely teach everyone the tricks of the trade.  The key to my successes in cake pops and really everywhere in the kitchen is simply trial and error. But I have learned some methods that surely do work every time to ensure a yummy final product.

  •  Make sure your cake to icing ratio is just right! (not too crumbly but not too moist)
  • It's very important that after you roll the balls they should stay in the fridge overnight so they are stiff (that way they don't fall off the sticks when you're dipping them too).
  • I prefer using a double boiler to melt the candy melts, but do whatever works best for you
  • Don't be afraid to experiment with new recipes/techniques. Baking is an art form, there is not one set way to do things!

Before I take credit for a lot of this, I'd just like everyone to know that the true genius behind these delicious little treats is Bakerella! Her book and videos on youtube were what helped me in the start. My best friend's mom actually bought me the book this summer, and it really made a difference (SHOUTOUT TO KENDRAAA)!!! I strongly recommend purchasing her book because she gives directions on how to make different kinds of pops, decorating ideas, recipes, and shipping and displaying methods.

Since I just started my blog yesterday, I thought I'd put together an overview of some of my cake pop creations thus far. I hope you enjoy the pictures!!!


 These are some of my early cake pop designs that I made for my summer lacrosse team. We are the Frederick Stars, so our colors are white, black, and gold. The cake on the inside may have been yellow or chocolate with vanilla or chocolate frosting. (my usual combos)


On July 18th, I completed my first cake pop order! My teammate's mom asked me to make her 2 dozen pops for her son's birthday. They were yellow cake with vanilla frosting, and I coated them with light blue candy melts and a white drizzle for some flare. Since she was shipping them to New York, I packaged them in clear treat bags tied with blue sparkly ribbon...unfortunately I was unable to get a picture of them all packaged up, but that certainly added was the perfect finishing touch.


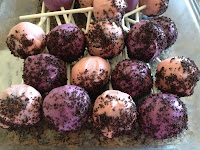
The three pictures above are actually oreo truffle pops! All you need is oreos and cream cheese to make these. I used pink and purple candy melts as you can see and decided to use the extra oreo crumbs to decorate the tops.


 The pops on the left are ones that I made for our fourth of July party. I'm pretty sure they were yellow cake with vanilla frosting. I used a glass vase type thing to make a cake pop bouquet! Everyone said they were a total hit, especially the display.
The pops on the right are Chocolate Pumpkin cake with Pumpkin Cream Cheese Frosting inside. Since the flavor inside was so rich I decided to just dip them in a simple orange or white.

Sunday, October 28, 2012

Recipe for White Chocolate Raspberry Cheesecake

After looking at those pictures I hope you were salivating! BTW, found this recipe from Pinterest. Here is the link to the lady's blog post :
http://kariscooking.blogspot.com/2011/02/lexis-favorite-cheesecake-factory.html

Lexi's Favorite Cheesecake Factory Copycat White Chocolate Raspberry Truffle Cheesecake

Ingredients for Crust:
1 1/2 cups chocolate cookie crumbs
crumbled Oreo cookies (filling removed)
1/3 cup butter, melted

Ingredients for Filling:
1/2 cup raspberry preserves
1/4 cup water
4 (8 ounce) packages cream cheese
1 1/4 cups granulated sugar
1/2 cup sour cream
2 teaspoons vanilla extract
5 eggs
4 ounces white chocolate, chopped into chunks

Optional Garnish:
2 ounces shaved white chocolate (optional)

Directions:
 1.Preheat oven to 475 degrees.
2. Create a water bath by placing a large pan filled with about 1/2-inch of water into the oven while it preheats.
3.  Combine the raspberry preserves with 1/4 cup water in a medium microwave-safe bowl. Heat for 1 1/2 minutes on high in your microwave. Stir until smooth. Strain to remove the raspberry seeds, then let the strained preserves sit to the side to cool. 
**I used seedless preserves which allowed to me omit this step**
4.  Measure 1 1/2 cups chocolate cookie crumbs into a medium bowl. Mix in 1/3 cup melted margarine. Press the crumb into a 9-inch spring form pan that has been lined on the bottom and side with parchment paper. Use the bottom of a drinking glass to press the crumb mixture flat into the bottom of the pan and about 2/3 the way up the side.
5.  Wrap a large piece of foil around the bottom of the pan to keep the cheesecake in the water bath. Put the crust in your freezer until the filling is done.
6.  Use an electric mixer to combine the cream cheese with the sugar, sour cream, and vanilla. Mix for a couple minutes or until the ingredients are smooth and creamy. Be sure to scrape down the sides of the bowl. Whisk the eggs in a medium bowl and then add them to the cream cheese mixture. Blend the mixture just enough to incorporate the eggs.
7.  Remove the crust from the freezer and sprinkle 4 ounces of white chocolate chunks onto the bottom of the crust.
8.  Pour half of the cream cheese filling into the crust. Drizzle the raspberry preserves over the entire surface of the filling. Use a butter knife to swirl the raspberry into the cream cheese. Pour the other half of the filling into the crust.
 9.  Carefully place the cheesecake into the water bath in the oven. Bake for 12 minutes at 475 degrees, then turn the oven down to 350 degrees and bake for 50 to 60 minutes or until the top of the cheesecake turns a light brown or tan color.
10.  Remove the cheesecake from the oven to cool. When the cheesecake is cool, use the foil from the bottom to cover the cheesecake and chill it in the refrigerator for at least 4 hours.
11.  Before serving, sprinkle the entire top surface of cheesecake with 2 ounces of shaved white chocolate. 

White Chocolate Raspberry Cheesecake

Last night my parents had friends over, so I decided I just had to prepare a desert for them...but we all know it was really just so I could try a new recipe! I was looking on Pinterest, and found a White Chocolate Cheesecake Recipe that I just knew I'd have to make for them! Here are some pictures I took of the final product :

My Story and Inspiration

 My inspiration for starting this blog is simply my love for baking! I'm a high school student and I've always baked, but didn't really start to have such a passion for it until this past summer. My discovery of cake pops really ignited the fire. I play for a lacrosse team during the summer and I started a tradition of making cake pops for every tournament. They certainly were a hit! Once I got that skill under my belt, I decided to take a cake decorating class with my mom. Let's just say she didn't quite pick it up as easily as I did! Since then, I've been experimenting with all sorts of different recipes..most of them from Pinterest (the most addictive site for a baker like me).

Now that you know my baking background, I bet you're wondering, "why name a blog 'Ubiquitous Baking'"? Well I've got the answer! My best friend's dad told me that my baked goods were ubiquitous because I always bring them with me when I go places. After I figured out the true definition of the word, I decided if I ever made a blog or opened up a bakery of my own one day I'd have to name it "Ubiquitous ______" (other part TBD) in honor of him. 

To save you time by having to look it up in the dictionary if you don't know it, here's the definition!!!

Ubiquitous [yoo-bik-wi-tuhs] adjective

existing or being everywhere, especially at the same time; omnipresent
(provided by dictionary.com)